Tag Archives: tree climbing spikes

Build you own Wind Turbine, why not?!

I want this place to be offgrid.

I do not want to rely on a power company that overcharges and dictates to us for something that is all around us.

Electric power in the form of energy is all around us.

Whether it is in Solar, Heat, Wind or Water, there is more Free power around us than we’ll ever need.

So, build a harness for it and jump on for the free ride…

A little test turbine

The cob house will get it’s power from Solar panels and some homemade wind turbines.

I have been experimenting with DIY wind generators for some time now and decided to put one up the cob house for testing.

This is a very basic 4 PVC blade attached directly to the shaft of a 180 volt DC permanent magnet Treadmill motor.

I mounted the pole very crudely by loading the base with bricks and tying it to the house with wire.
I also erected it in an area which gets blustery wind due the the tree next to it and others in the close vicinity.
I wanted a Worst case scenario benchmark to work from.

Hiding in the trees
Hiding in the trees
Closer view of the basic generator

I used a 4 blade configuration so that I required a lower start up wind speed as this has more surface area facing the wind ( called the Swept Area )

4 blades does however mean increased drag and this translates into slower RPM on the motor shaft than a 3 blade configuration.

There is plenty of info on the internet on how to build a generator like this using 6 or 8 inch PVC pipe as the blades.
Below is a schematic on how to cut the blades from the pipe so that you can have 6 equal blades to experiment.
Also, a pic of a nicer looking 4 blade design from http://www.instructables .com
Once again, thank you to the authors.

Cutting schematic for PVC wind turbine generator blade. Horizontal Axis Wind turbine
4 blade PVC Diy Wind turbine generator blades

Treadmill motors are perfect for wind turbines as they create dc voltage at very low RPM (revolutions per minute)
They are normally rated up to around 180 Volts DC at around 2000 to 3000 RPM at 3 to 8 amps depending on the individual motor.

What this translates to is that:If you spin the shaft of the motor at 2000 to 3000 RPM, you will be able to measure up to 180vdc from the motor.
This can then be coupled to a battery through a blocking diode to charge to battery.
The battery in turn can then light DC lights or AC appliances through an inverter.

Very basic, but this is the general jist of why.

Here is a basic schematic of a system in more detail from http://www.homebrewpower.co.uk
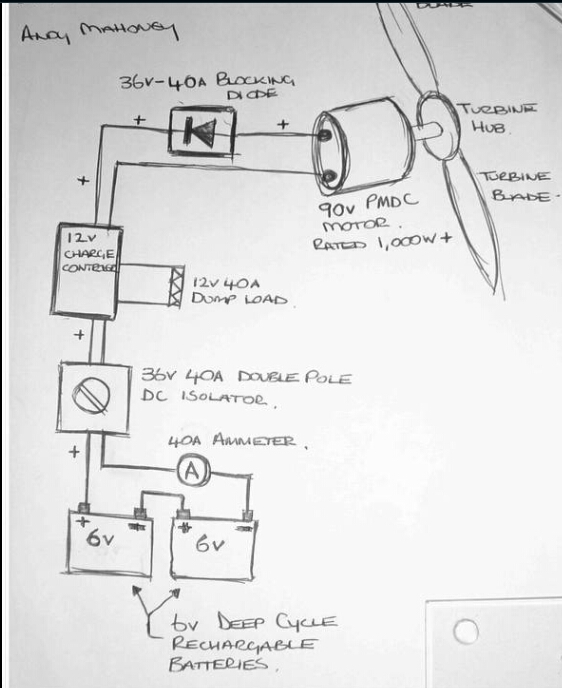
www.homebrewpower.co.uk has some great info. Thank you
http://www.homebrewpower.co.uk has some great info. Thank you

I ran a few tests on my basic turbine and was reasonably impressed with the results.
Although the location of the turbine meant that it received very little wind whilst hiding on a low pole behind in the trees, I was able to glean good info on how to build my next turbine capable of supplying at least 40% of my proposed needs.

The new turbine will be mounted on a salvaged fiberglass street light pole approximately 12 meters high in a high wind “traffic” area.
It consists of a 6 blade 1.7m diameter turbine with an 1:11 ratio turning 2 x 2kw Treadmill motors via a belt.
Therefore 1 revolution of the turbine blades will turn the motor shafts 11 times.

Example: 100 blade RPM = 1100 motor shaft RPM

Here is the beginning of this experiment:

Upcycled  Wheelchair rim will turn the belt over the 2 treadmill motors. Not pretty, but she'll be effective!
Upcycled Wheelchair rim will turn the belt over the 2 treadmill motors. Not pretty, but she’ll be effective!

It is useful to know a few things about Wind turbines if you are looking into building one for your own uses.
Some of these include:

Air density: at the coast and in lower lying areas, the air is denser due to the amount of water vapour in the air.
This means that the wind is “heavier” and carries more strength than the thinner air of higher altitudes, meaning faster RPM on the blades at lower wind speeds due to the
Power of the heavy air.
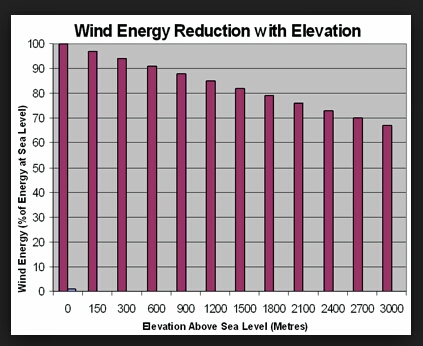
Air power versus elevation

The higher the turbine, the more effective:
Turbines mounted on higher poles do not suffer as much from bluster wind which has bounced off of obstructions at lower levels.
These obstacles also take a lot of the power out of the wind.

Tip Speed Ratio:
This relates to drag on the blades.

Weight of Blades: heavier blades require more power from the wind to turn them. Some people do preferred build blades out of wood, but the preference is the lighter, the better.
Hence, blades cut from PVC pipe offer lightweight solutions to this.

Flexible blades reduce efficiency:
Blades that are too flexible or cut from soft materials and bend back more than about 5% in good wind are hindering the efficiency with increased drag.

DC Motors: all DC motors can produce voltage when coupled to blades, but rather look for motors with lower rpm and higher voltage ratings. This means that your turbine will not
need to spin stupidly fast just to light and led or charge a mobile phone.

Blade design: fewer blades mean that the turbine rotate faster with less drag but will need higher wind speeds to start it turning.
More blades mean slower start up wind speeds but slower blade speeds. Search Tip Speed Ratio for more info on this.

Tree felling 101

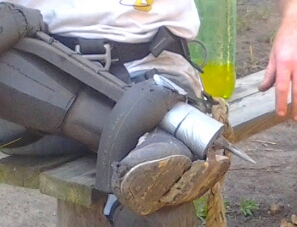
As mentioned in the last post, I don’t have loads of cash to throw at removing these trees. So, I do it myself. What I have had to build and experiment with is Tree Climbing spikes. These little buggers help you to climb stupidly high in order to get to the tops of the trees for cutting. They are effectively just a long spike protruding from the inside curve of your boot, which you kick into the tree to give you grip. Put a rope around the tree to hold on to and go.

Obviously, climbing harness, carabiners, safety ropes and such must accompany you!

DIY Tree Climbing Spikes
DIY Tree Climbing Spikes 2
Tree Climbing with Spikes DIY
Up a tree to secure a cable
Cable secured
Cable secured
I ALSO WANNA CLIMB DADDY!

On most of the trees that I have recently felled, I was allowed enough space to let the tree fall where I wanted it to. To do this I climbed the said trees and secured a long strong cable at about two thirds of the way up. I then fastened the other end to the Jeep ( normally snaking around the base of a tree in the direction I wanted it to fall) I loaded the Jeep with bricks and rocks to weight it down for more traction, put it into Low Range and pulled the tree as tight as possible. I then fired up the chainsaw and cut out the ‘V’ near the base of the tree in the direction I wanted it to fall. I I then cut around the sides and back of tree until I heard the tree shift and start to lightly click as the heartwood fibres took strain. I then sprinted my ass off to the Jeep, started it up and pulled.
Some times I’d have to repeat the last 2 steps a few times before the tree gave way. (Better safe and tired than sorry) The tree would begin to shift under the torque of the vehicle and start coming down. I would keep the tension on the cable for as long as possible to ensure that the tree fell exactly where I wanted it. Even on the badly leaning trees I was able to land them near on perfect.

20140504_11103620140504_11100620140504_120802inthetreescobhouse.wordpress.com tree removal

Cob house Inthetreescobhouse grass roof

MY NEMESIS:

The last tree on the menu on Sunday had been giving me a worried finger for a long time. I
It had been shaped by the prevailing South Westerly wind to curve from it’s base to midway and then straighten up but keep all of it’s weight and foliage on the wrong side.
Cutting it at the base meant dropping it possibly on the house and definitely on the neighbor’s fence and chicken coop.
No vehicle in my reach would be able to pull it over against it’s strength and weight.

So, suck it in, climb and cut..

Mr Nemesis
Mr Nemesis
Rather high,  Mr Vertigo.
Rather high, Mr Vertigo.
And the wind started picking up!

It took me about an hour before I started to cut up there with the chainsaw. Life at that height is a different world.
I even phoned my wife to come and give me moral support!
I managed to cut all the weight off the tree to then cable it and cut/pull with the Jeep.
Done. Yay!

My girls coming to give me moral support! I was trying to pretend I was on a ship's mast by singing a sailor's songs!
My girls coming to give me moral support!
I was trying to pretend I was on a ship’s mast by singing a sailor’s songs!

In the trees.?

We decided to call our little piece of freedom this for 3 reasons.

* We’re not “in the money”

* Our heads aren’t “in the clouds” anymore, though they aren’t buried in the sand either.

* there are lots of trees…..

………..* also, one day, hopefully soon, I’ll build a main bedroom in the three trees above the current main bedroom to give all 3 kids their own rooms. Then Anel and I will be “in the trees” [read: Treehouse Sanctuary, away from the wild animals below!]

View upthe drive before felling

We have mainly Bluegum trees (Eucalyptus) growing on the land as they were introduced by the original owner of the farm and planted as a windbreak in rows. I guesstimate that some of the older trees must be around 80 years old.

Bluegum trees do not have particularly deep root bases, grow up to 40 metres high and have a rather irritating habit of falling over.

As there have also been a few fires that had come through the land previously, scarring the bases of some of the taller trees, a few trees had weaker or rotted sections.

Scary to think about when standing under them in high winds.

I have been wanting to clear a few more trees from the house area for a while as I am not too keen to catch a 4 ton log before it rests on the roof.

Two leaning problem trees

Removing problem trees is normally a Very costly affair if you get the experts in.
In my case, the two trees in the photo above would have cost me around R6000 or $500 EACH to remove. In the trees, not the money, remember?

So called professional tree fellers in our area also do not even carry a 100% property safety guarantee and insurance for their work.

I knew this from the beginning of our plot life so I am not sitting here with a worried finger up my bum, I’m just saying…